
GR-COTTON INFRARED REMOTE CONTROL TRANSMISSION
GR-COTTONでリモコンの送信を行いました。
赤外線LEDに以下を使用しました。
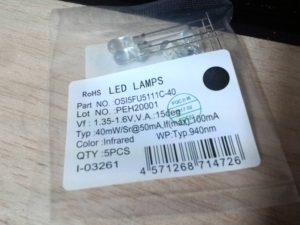
5mm赤外線LED OSI5FU5111C-40 (5個入)
http://akizukidenshi.com/catalog/g/gI-03261/
オームの法則E=IRから挿入する抵抗値を計算します。
(Vcc-Vf ) = 100mA x R
Vfは、データシートから1.35V、電流Ifは定格の100.mAとします。
(3.3-1.35)= 0.100 x R
R = (3.3-1.35)/0.100 = 19.5Ω
19.5Ω以上にすればよいので22Ωの抵抗を使用しました。
送信プログラムは、以下サイトを参考にさせていただきました。ありがとうございます。
https://www.erestage.com/arduino/arduino-send-remo/
プログラムの説明をします。
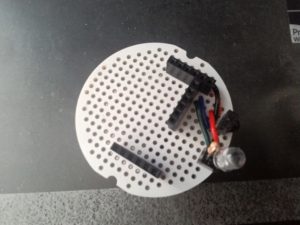
赤外線LEDを4番ピンに接続しました。
const int LED = 4;
const int STATE_ON = 1;
const int STATE_OFF = 0;
前回取得した 赤外線リモコンのOFF・ONデータを定義します。
int data[2][39] = {
// 1 2 3 4 5 6 7 8 9 10 11 12 13 14 15 16 17 18 19 20 21 22 23 24 25 26 27 28 29 30 31 32 33 34 35 36 37 38 39
{273,252,98,70,96,72,96,175,96,72,96,175,96,172,99,72,96,175,97,5378,270,252,96,72,96,71,97,175,96,72,96,175,96,175,96,71,96,175,96},
{262,257,91,79,88,79,89,79,89,183,88,183,89,182,89,180,91,79,89,5385,262,260,88,77,91,79,89,79,88,182,89,183,88,183,88,182,89,79,89}
};
setup()関数で赤外線LEDのピンを出力に設定します。
pinMode(LED, OUTPUT);
loop()関数の説明をします。
電灯受信器に対して点灯を指示します。
sendSignal(STATE_ON);
3秒間待機します。
delay(3000);
電灯受信器に対して消灯を指示します。
sendSignal(STATE_OFF);
3秒間待機します。
delay(3000);
リモコン信号を送信部分のsendSignal() 関数を説明します。
LEDは、LOWで点灯、HIGHで消灯です。
リモコンは、38kHz変調されています。ON時のデューティー比は、1/3です。
38kHzの1周期は、約26.3usです。ON時間を8us、OFF時間を17usとしました。
int dataSize = sizeof(data[mode]) / sizeof(data[mode][0]);
for (int cnt = 0; cnt < dataSize; cnt++) {
unsigned long len = data[mode][cnt]*10;
unsigned long us = micros();
do {
digitalWrite(LED, (cnt%2) ? HIGH : LOW);
delayMicroseconds(8);
digitalWrite(LED, HIGH);
delayMicroseconds(17);
} while (long(us + len – micros()) > 0);
サンプルプログラムは以下にあります。
https://github.com/jendo1969/GR-COTTON/blob/master/Remocon/Remocon.ino
We sent remote control with GR – COTTON.
I used the following for the infrared LED.
5 mm Infrared LED OSI 5 FU 5111 C – 40 (5 pieces included)
http://akizukidenshi.com/catalog/g/gI-03261/
Calculate the resistance value to be inserted from Ohm’s law E = IR.
(Vcc-Vf ) = 100mA x R
Vf is 1.35 V from the data sheet, and the current If is rated 100 mA.
(3.3-1.35)= 0.100 x R
R = (3.3-1.35)/0.100 = 19.5Ω
Since it is only necessary to set it to 19.5 Ω or more, a resistance of 22 Ω was used.
For the transmission program, I referred to the following site. Thank you very much.
https://www.erestage.com/arduino/arduino-send-remo/
I will explain the program.
I connected the infrared LED to pin 4.
const int LED = 4;
const int STATE_ON = 1;
const int STATE_OFF = 0;
Define OFF / ON data of infrared remote control that was acquired last time.
int data[2][39] = {
// 1 2 3 4 5 6 7 8 9 10 11 12 13 14 15 16 17 18 19 20 21 22 23 24 25 26 27 28 29 30 31 32 33 34 35 36 37 38 39
{273,252,98,70,96,72,96,175,96,72,96,175,96,172,99,72,96,175,97,5378,270,252,96,72,96,71,97,175,96,72,96,175,96,175,96,71,96,175,96},
{262,257,91,79,88,79,89,79,89,183,88,183,89,182,89,180,91,79,89,5385,262,260,88,77,91,79,89,79,88,182,89,183,88,183,88,182,89,79,89}
};
Use the setup() function to set the infrared LED pin to output.
pinMode(LED, OUTPUT);
I will explain the loop() function.
Instruct the lighting receiver to light up.
sendSignal(STATE_ON);
I will wait for 3 seconds.
delay(3000);
Instruct the light receiver to turn off.
sendSignal(STATE_OFF);
I will wait for 3 seconds.
delay(3000);
Describe the sendSignal () function of the transmit part of the remote control signal.
The LED is lit with LOW, and it is off with HIGH.
The remote control is 38 kHz modulated. The duty ratio when ON is 1/3.
One cycle of 38 kHz is about 26.3 us. We set the ON time to 8us and the OFF time to 17us.
int dataSize = sizeof(data[mode]) / sizeof(data[mode][0]);
for (int cnt = 0; cnt < dataSize; cnt++) {
unsigned long len = data[mode][cnt]*10;
unsigned long us = micros();
do {
digitalWrite(LED, (cnt%2) ? HIGH : LOW);
delayMicroseconds(8);
digitalWrite(LED, HIGH);
delayMicroseconds(17);
} while (long(us + len – micros()) > 0);
The sample program is below.
https://github.com/jendo1969/GR-COTTON/blob/master/Remocon/Remocon.ino
我們用GR-COTTON發送了遙控器。
我使用以下紅外LED。
5 mm紅外LED OSI 5 FU 5111 C – 40(包括5個)
http://akizukidenshi.com/catalog/g/gI-03261/
計算從歐姆定律插入的電阻值E = IR。
(Vcc-Vf ) = 100mA x R
數據手冊中的Vf為1.35 V,電流If為100 mA。
(3.3-1.35)= 0.100 x R
R = (3.3-1.35)/0.100 = 19.5Ω
由於只需要將其設置為19.5Ω或更大,所以使用22Ω的電阻。
對於傳輸程序,我參考了以下站點。 非常感謝。
https://www.erestage.com/arduino/arduino-send-remo/
我會解釋這個程序。
我將紅外LED連接到引腳4。
const int LED = 4;
const int STATE_ON = 1;
const int STATE_OFF = 0;
定義上次獲取的紅外遙控器的OFF / ON數據。
int data[2][39] = {
// 1 2 3 4 5 6 7 8 9 10 11 12 13 14 15 16 17 18 19 20 21 22 23 24 25 26 27 28 29 30 31 32 33 34 35 36 37 38 39
{273,252,98,70,96,72,96,175,96,72,96,175,96,172,99,72,96,175,97,5378,270,252,96,72,96,71,97,175,96,72,96,175,96,175,96,71,96,175,96},
{262,257,91,79,88,79,89,79,89,183,88,183,89,182,89,180,91,79,89,5385,262,260,88,77,91,79,89,79,88,182,89,183,88,183,88,182,89,79,89}
};
使用setup()函數設置紅外LED引腳輸出。
pinMode(LED, OUTPUT);
我將解釋loop()函數。
指示照明接收器點亮。
sendSignal(STATE_ON);
我會等待3秒鐘。
delay(3000);
指示光接收器關閉。
sendSignal(STATE_OFF);
我會等待3秒鐘。
delay(3000);
描述遙控信號傳輸部分的sendSignal()函數。
LED指示燈亮起,低電平時亮起。
遙控器是38千赫調製。 ON時的佔空比為1/3。
38千赫的一個週期約為26.3美元。 我們將ON時間設置為8us,將OFF時間設置為17us。
int dataSize = sizeof(data[mode]) / sizeof(data[mode][0]);
for (int cnt = 0; cnt < dataSize; cnt++) {
unsigned long len = data[mode][cnt]*10;
unsigned long us = micros();
do {
digitalWrite(LED, (cnt%2) ? HIGH : LOW);
delayMicroseconds(8);
digitalWrite(LED, HIGH);
delayMicroseconds(17);
} while (long(us + len – micros()) > 0);
示例程序如下。
https://github.com/jendo1969/GR-COTTON/blob/master/Remocon/Remocon.ino