
GR-ADZUKI Bend Sensor
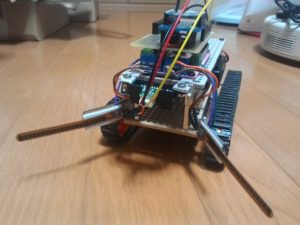
GR-ADZUKIに曲げセンサを接続しました。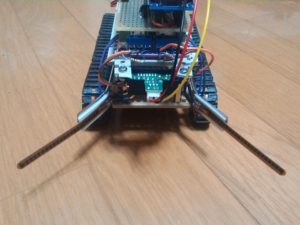
SENSOR1とSENSOR2の両方に2本つけています。
SparkFun SEN-10264 曲げセンサー(小)
https://www.sengoku.co.jp/mod/sgk_cart/detail.php?code=EEHD-05ZH
データシートは以下にあります。
https://cdn.sparkfun.com/datasheets/Sensors/ForceFlex/FLEX%20SENSOR%20DATA%20SHEET%202014.pdf
センサは、曲がっていない時が10kΩです。5Vとアナログ入力の間に10kΩでつなぎ、曲げセンサの一方をアナログ入力、一方をGNDにつなぎます。
センサの曲がりで具合で抵抗値が変わるので抵抗比により入力電圧が変化します。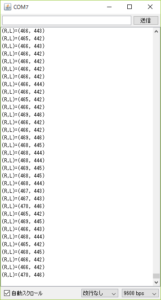
プログラムの説明をします。
まず、左右の曲げセンサのアナログ入力ピンを宣言します。
const int R_Bend = A0;
const int L_Bend = A1;
続けて曲げセンサの値を保持する変数を宣言します。
int R_Bend_Value = 0;
int L_Bend_Value = 0;
setup()関数でシリアル通信を開始します。
Serial.begin(9600);
loop()関数で曲げセンサの入力を読み込みます。
R_Bend_Value = analogRead(R_Bend);
L_Bend_Value = analogRead(L_Bend);
計測値をシリアルモニタに送ります。
Serial.print(“(R,L)=(“);
Serial.print(R_Bend_Value);
Serial.print(“, “);
Serial.print(L_Bend_Value);
Serial.print(“)”);
Serial.println();
300ms毎に計測を繰り返します。
delay(300);
サンプルプログラムは以下にあります。
https://github.com/jendo1969/GR-ADZUKI2/blob/master/bend_sensor/bend_sensor.ino
We connected the bending sensor to GR-ADZUKI.
Two are attached to both SENSOR 1 and SENSOR 2.
SparkFun SEN-10264 bending sensor (small)
https://www.sengoku.co.jp/mod/sgk_cart/detail.php?code=EEHD-05ZH
The data sheet is below.
https://cdn.sparkfun.com/datasheets/Sensors/ForceFlex/FLEX%20SENSOR%20DATA%20SHEET%202014.pdf
When the sensor is not bent, it is 10 kΩ. Connect 5 V and analog input with 10 kΩ, connect one side of the bending sensor to analog input, and connect one side to GND.
Because the resistance value changes depending on the bending of the sensor, the input voltage varies depending on the resistance ratio.
I will explain the program.
First, declare the analog input pins of the left and right bending sensors.
const int R_Bend = A0;
const int L_Bend = A1;
Continue declare a variable holding the bending sensor value.
int R_Bend_Value = 0;
int L_Bend_Value = 0;
Start serial communication with setup() function.
Serial.begin(9600);
Read the bending sensor input with the loop() function.
R_Bend_Value = analogRead(R_Bend);
L_Bend_Value = analogRead(L_Bend);
Send the measured value to the serial monitor.
Serial.print(“(R,L)=(“);
Serial.print(R_Bend_Value);
Serial.print(“, “);
Serial.print(L_Bend_Value);
Serial.print(“)”);
Serial.println();
Repeat the measurement every 300 ms.
delay(300);
The sample program is below.
https://github.com/jendo1969/GR-ADZUKI2/blob/master/bend_sensor/bend_sensor.ino
我們將彎曲傳感器連接到GR-ADZUKI。
兩個連接到傳感器1和傳感器2。
SparkFun SEN-10264彎曲傳感器(小)
https://www.sengoku.co.jp/mod/sgk_cart/detail.php?code=EEHD-05ZH
數據表如下。
https://cdn.sparkfun.com/datasheets/Sensors/ForceFlex/FLEX%20SENSOR%20DATA%20SHEET%202014.pdf
當傳感器沒有彎曲時,它是10kΩ。 連接5 V和10kΩ的模擬輸入,將彎曲傳感器的一側連接到模擬輸入,並將一側連接到GND。
由於電阻值根據傳感器的彎曲而變化,所以輸入電壓根據電阻比而變化。
我會解釋這個程序。
首先,聲明左右彎曲傳感器的模擬輸入引腳
const int R_Bend = A0;
const int L_Bend = A1;
繼續聲明一個保存彎曲傳感器值的變量。
int R_Bend_Value = 0;
int L_Bend_Value = 0;
使用setup()函數開始串行通信。
Serial.begin(9600);
使用loop()函數讀取彎曲傳感器輸入。
R_Bend_Value = analogRead(R_Bend);
L_Bend_Value = analogRead(L_Bend);
將測量值發送到串行監視器。
Serial.print(“(R,L)=(“);
Serial.print(R_Bend_Value);
Serial.print(“, “);
Serial.print(L_Bend_Value);
Serial.print(“)”);
Serial.println();
每300毫秒重複一次測量。
delay(300);
示例程序如下。
https://github.com/jendo1969/GR-ADZUKI2/blob/master/bend_sensor/bend_sensor.ino